Overworld Part 4 (Shrine of Osiris & Waterfall of Sobek)
Task:
Climb the Water Wheel and Raid the Tomb of the Ferryman
Temple of Osiris
Back to the Shrine
Run back across the bridge again and jump the gap.Shrine of Osiris
To the Water Wheel
Before reaching the shrine, turn towards Lara's right, towards the top of the screen.Red Skull (4/10):
Slightly to the left you will find a broad column with a red skull on top. Scale the ladder to grab the Red Skull #4.
After grabbing all gems, head up the broad stairs on the right side of the area, to find a large wooden waterwheel that has become active.
Up the Water Wheel
Jump onto one of the wooden ledges and let it take you upwards.Red Skull (5/10):
Stay on the wheel for a full round, until you reach the spot with the red skull. When underneath, jump straight up to collect the Red Skull #5.
Jump off the wooden wheel towards the stone ledge on the right side of the screen, where you can see a column with a glyph.
Collect the gems. Then stand on the raisable block with the Osiris glyph and use the Staff of Osiris to raise it and yourself off the ground. Pull up onto the aqueduct. Waterfall of Sobek
Arrow Traps and Spike Gates
Follow the aqueduct upstream, towards the right. Beware of the set of three arrow traps by the spears blocking the path. Dispose of them using a remote bomb.Max Ammo Upgrade:
If you look to Lara's left, you can see a ledge with one of those glowing orbs, but before dealing with it, there is an ammo upgrade to grab, which is dangling at the left end of that platform. Stand at the edge of the aqueduct below the golden ring, then use the grapple to grab that ring and rappel upwards to grab the Max Ammo Upgrade. Afterwards, swing back over to the ledge where you came from.
Now climb up to the higher level with the glowing orb and use the Staff of Osiris like a weapon to destroy Set's mark, which opens the spear gate below.
Beware, when getting back down, opening the gate has also cleared the path for the six arrow traps awaiting you at the end of the path. Roll over there quickly and use a remote bomb to destroy them.
Stand back from the wall and attach the grapple to the golden ring above. Climb up the rope and step onto the pressure pad. This will open another spear gate, back where Set's mark was.
Hop down and backtrack to that last spot, climb up to where the mark was and step through the opened spike gate.
Step onto the raisable block with the Osiris glyph and use the staff to get up. Jump off, onto the platform with a 250-gem-treasure-chest and from here jump onto the upper part of the aqueduct. There are three medkits to grab on the left. Follow the aqueduct upstream. Beware of the arrow traps, three on the left, three on the right and three on the left again.
Red Skull (1/5):
Shortly after there is an opening in the wall on the left where Lara can jump towards a column. To the right of this column is a second, higher column that houses a red skull. Jump over there to grab the Red Skull #1. From here you can jump straight over the high wall, back onto the aqueduct.
Shortly after the red skull, you can climb up onto a ledge on Lara's left to shoot some vases and grab the gems inside. There are even more gems below the waterfall and on the next ledge left of the stairs.
Red Skull (2/5):
At the top of the first set of stairs, turn right. Collect the gems on the lower platform, before attaching the grapple to the golden ring and before abseiling towards the Red Skull #2 to the left. Climb back up.
Follow the stairs further upwards. There is a ledge above you with a temple's entrance. Use the two columns at the edge of the ravine to the top right corner of the screen to reach the ledge, collecting the gems on the way and awaiting you on the platform.
Challenge Tomb (3):
Step through the doorway into the challenge tomb.
Shoot the vases to collect some gems.
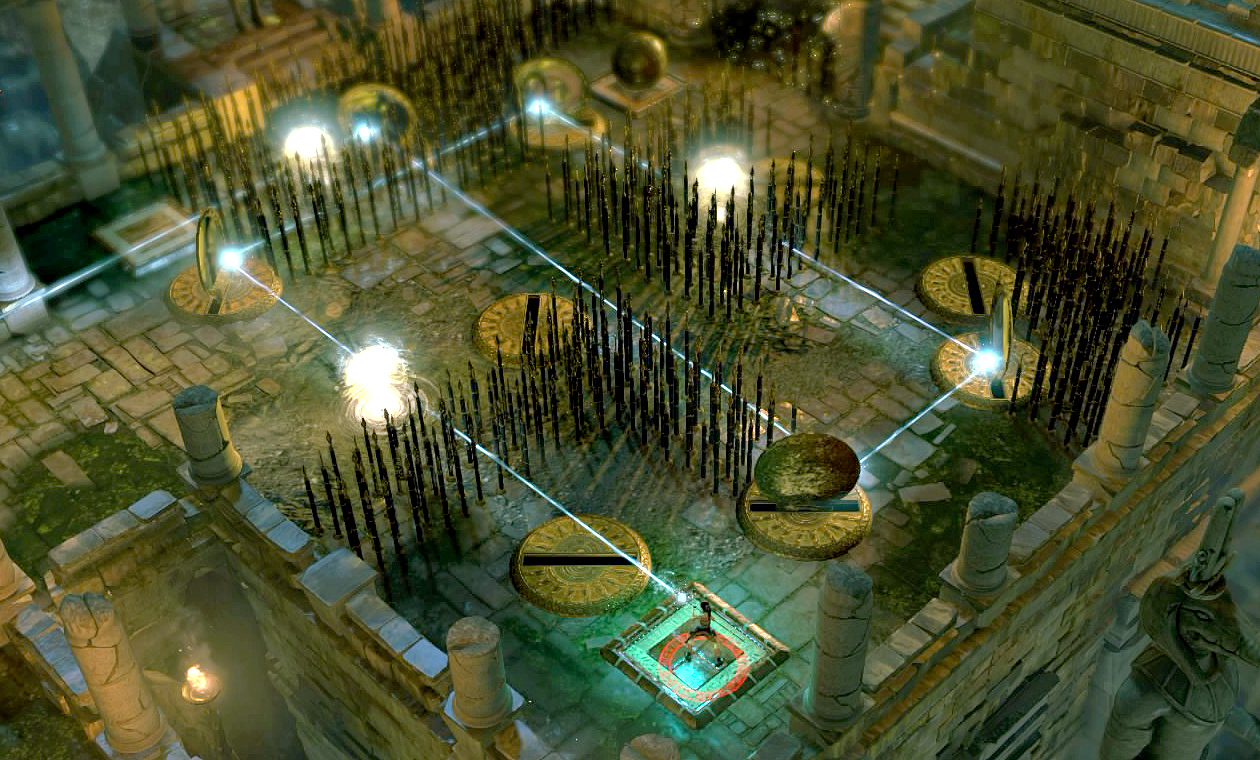
The area behind presents you with a puzzle involving three Set's Marks, a couple of retractable mirrors, three pressure plates, and a single rolling ball.
Move the rolling ball onto the pressure pad closest to the blocked spike gate. Then stand on the pressure pad on the right side of the room, at the bottom of the screen. Aim Osiris' Staff towards Set's Mark located to the left. If necessary adjust your angle so the beam is reflected off the mirror located behind that mark, bounces off the mirror closest to the rolling ball, goes through Set's Mark at the back of the room, into the mirror on the right side of the screen, from where it is reflected towards the second mirror on the right, bounces over to the top of the screen from where it is directed at the third and final Mark of Set.(Image)
 Hold it until all three marks are destroyed and the gate opens. Step through and run up the stairs, to collect the Max Ammo Upgrade and the Automatic Shotgun. Climb up to the Anubis bust to grab more gems. Now you can leave the challenge tomb again.
Run further up the stairs.
Red Skull (3/5):
After a few steps, you can spot another red skull in the cracked temple wall above the path. Circle around at the end of the stairs and climb up into the gap to grab the Red Skull #3. Hop back down.
Once you get around the corner to the lake in front of the Tomb of the Ferryman, a crocodile creature, a Priest of Sobek, wielding a spear will attack you. Shoot it till it drops and then use a remote bomb to finish him off.
Clear the lake of gems. There are also medkits and ammunition to be found around the lake.
Red Skull (4/5):
Now make your way to the left side of the lake and walk down towards the screen, where you will find an outcropping man made ledge with the Red Skull #4 on top. Grab it and return to the lake.
Across the lake, at the back left corner you can find the entrance of the Tomb of the Ferryman. To the right of it you can see another lit entrance across the water. We will take care of this challenge tomb later.
Red Skull (5/5):
The red skull however is reachable. Jump into the water and swim over there, to grab the Red Skull #5. You will be rewarded with the Copper Spirit Ankh of Heb for collecting all five. Swim back to the platform with the entrance of the Tomb of the Ferryman.
Now approach the large circular puzzle in front of the locked tomb. This is a game of chance. Use the Staff of Osiris to destroy Set's Mark and set the wheel into motion. Step onto the Eye of Horus at the centre of the wheel and place a remote bomb, clear the blast radius before detonating it.
One of three symbols will show up on one of the six fields of the wheel:
- a crocodile, in which case you will be confronted with another of Sobek's Warriors you need to kill
- a gem, in which case you will be rewarded with a shower ofgems
- a sun, in which case the door to the tomb opens
Max Ammo Upgrade:
And even if you did, continue the spinning, until you've uncovered all fields. Uncovering the last one will reward you with extra gems and a Max Ammo Upgrade.
Then step into the Tomb of the Ferryman.
© www.tombraidergirl.com Personal use only, no reproduction. Last changes: 14 Feb 2024, 18:40

Isn't she beautiful? I'm falling in love all over again.